Showing posts with label Altered. Show all posts

Thursday, January 17, 2013

Christmas Crafting


 Show & Tell Thursday's


I have some AMAZINGLY talented friends. I am both inspired and intimidated by them!
There are four lovely ladies who are not only some of my most favourite people in the world but also some of the most creatively talented people I know.

Ruth, Janine, Jennie, Nicola and I decided that we were going to do a Christmas present swap with each other.
We all made pinterest boards especially for the swap. We had to pin things that we would like someone else to make us. Then we all went through each others boards and picked something to make for each person. So we made and received 4 gifts each.
See my board HERE

So now it is after Christmas I can share what I made and what I received.

NICOLA


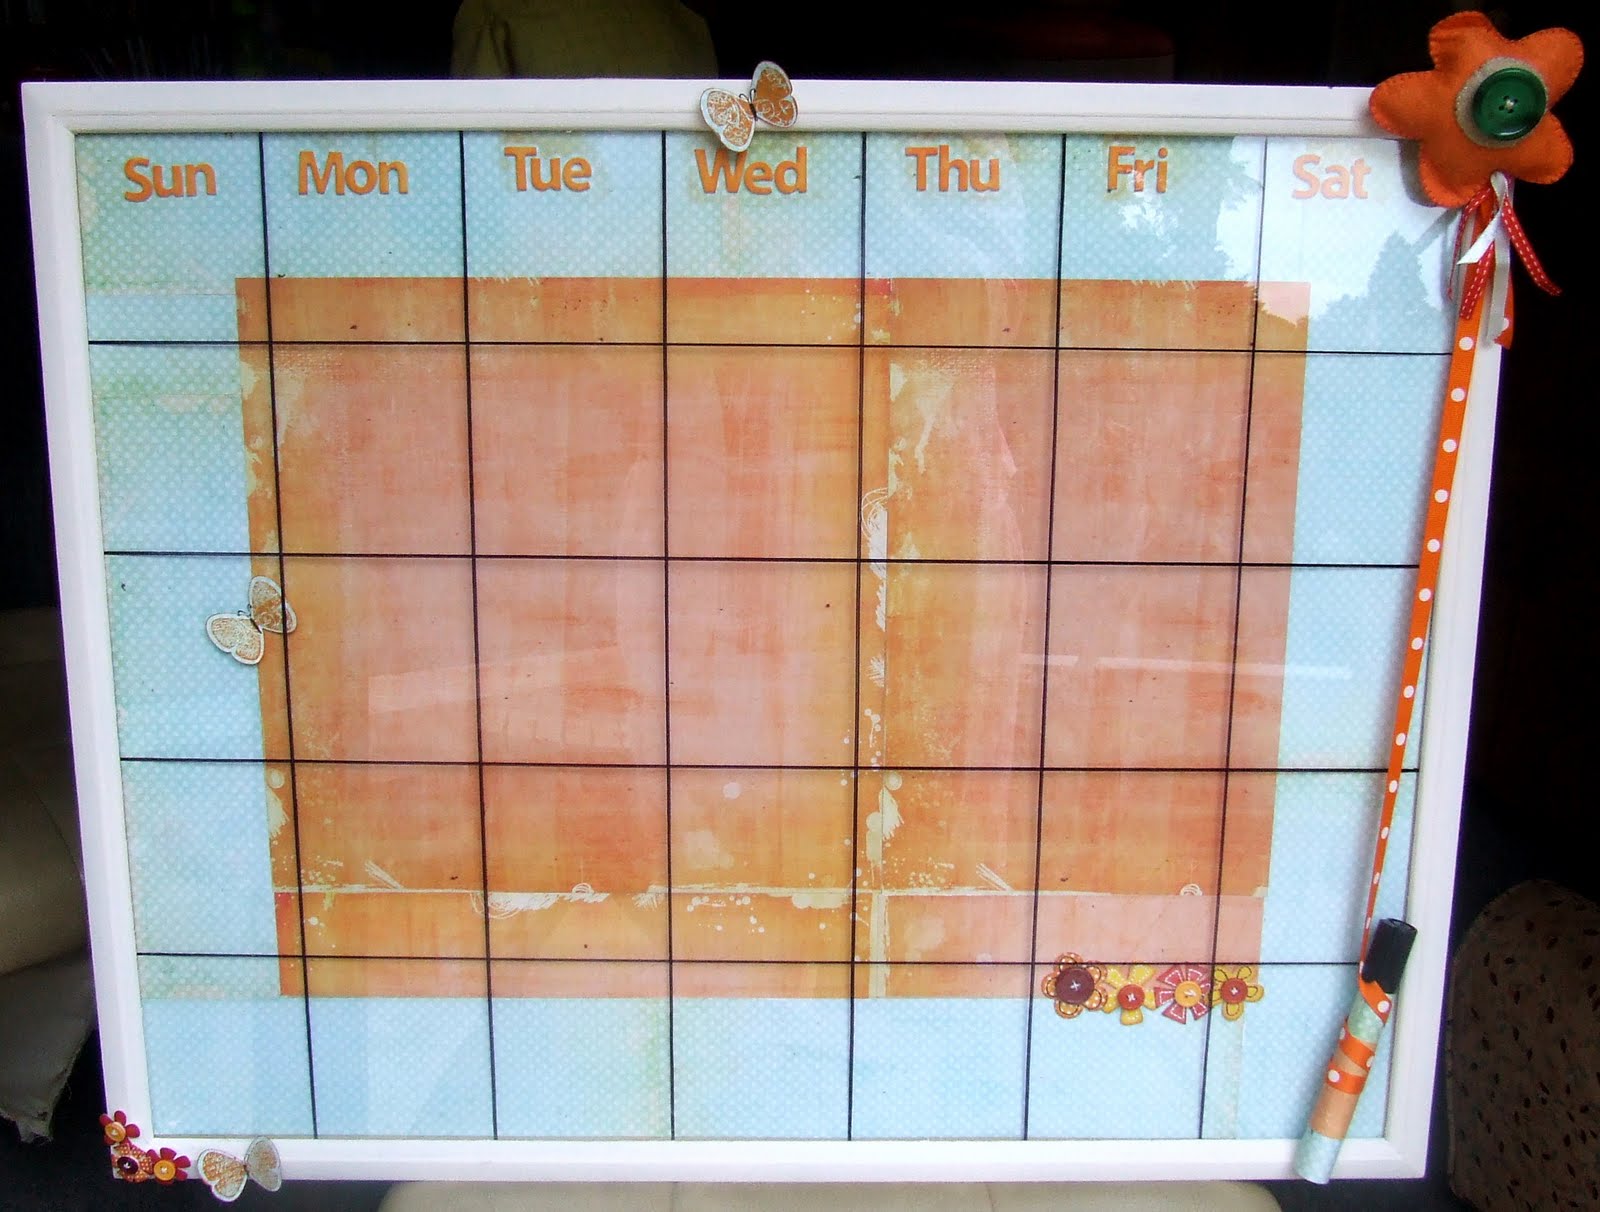
Nic pinned this photo frame whiteboard on her board. She also mentioned that her favourite colour was blue, so I set to work.


I found an old frame in my stash of things and cleaned it up. Then using the Sweetest Thing Bluebell Collection from My Minds Eye I made this.


I spent ages dividing it into 7 pieces and stamped a day on each part. Embellished with some flowers, butterflies and a Kaisercraft wooden Birdcage and we were done!
I am really pleased with how it turned out, and I am super glad it arrived in Christchurch in one piece! 

I have always loved these melted crayon pictures. 
I have always wanted to try it myself, and I will get around to doing it ... eventually!!


Nic used this pin to inspire (literally) to make this AWESOME melted crayon art.


I absolutely ADORE it!! At the moment it is hanging in my library. I think it will eventually end up in my craft space when I renovate in there.

RUTH

I started out making something completely different for Ruth but it didn't quite work out. I went scrolling through her  board and saw these and though "hmmm I could make those"


So I raided the kids block box and using It's The Little Things Collection from Fancy Pants and loads of Mod Podge I made these.


Abbey was rather fond of them and Ruth was lucky they weren't stolen, so I might need to make some more!

Ruth was sneaky and didn't make me anything off my board. She knows how much of a Harry Potter freak I am though. Check these beauties out HERE


So she made this for me


I LOVE this sooo much!! It is definitely going to go in the library!

JANINE

For Janine I picked this as inspiration


I spent a while looking for what to use. I didn't want to make card ones I was hoping to find some big wooden dice. One day I happened to walk into Spotlight one day and they had little wooden Calendars ... PERFECT!
So I took it home pulled it apart and did this to it ....


I used The Sweetest Thing Bluebell Collection from My Minds Eye for this. I already knew Janine liked this collection because she has bought quite a bit of it in The Scrap Heap Store!!

Janine really surprised me with her gift to me. Firstly because it wasn't a medium she usually uses and because of how it looked sooo much like the original pin! 
This is what I pinned


And this is what she made 


It's us!! The three Art Night Girls, Roo, J9 & Me .... I Love it!!!
This one I think might end up on the wall in my bedroom.

JENNIE

I knew I wanted to make it as soon as I saw it on Jennie's board!! I might even eventually make one for myself (in orange of course!!)

Pin


And my version


I used The Sweetest Thing Bluebell collection from My Minds Eye again (one of my favourites!) And I filled it up with lollies!

Jennie got inspiration for my present from this pin


She totally blew me away with the little suitcases she made! I love them so much! And excellent colour choices too!!


They are on my mantelpiece at the moment. And look awesome.

I am such a lucky lucky girl to get such amazing presents from my amazing friends! I can't wait to do it again for this years Christmas!!!

Monday, May 7, 2012

Better After

This weeks Better After is a project that I have been meaning to do for a looooong time!!


My Grandad made these little shelves probably when I was about Abbeys age! There are 3 shelves and they have been around a long time. I used to put all my little ornaments and figurines on them. They were one of my most favourite things. At various houses we have lived in we have had these on the wall in Abbey's bedroom. I thought it was time to make them much more pretty and girly and more Abbey-like.


I didn't take during pics but I will explain to you in steps what I did ...

Step 1:  I pulled off the hideous green felt. Grandad put it on so my "things" wouldn't slip. Very thoughtful and I guess that is all that was around at the time ...... It left some of the shelves rather sticky which I was quite surprised with since it's been on there for a good 30 years!!

Step 2: I gave every surface a gentle sand. Just to rough it up slightly.

Step 3: Using the topper most shelf I made a template on cardboard. I tipped the shelf upside down and drew around it. I then cut around the template and then used it to cut out the papers Abbey had chosen for her shelf. To have covered the whole shelf in the same paper would have taken three 12x12 scrapbooking sheets. And of course because of Murphy and his law I only had a maximum of two of each of the sheets Abbey chose! I really wanted to use my stash rather than get new stuff so we decided to go with 3 different papers from the same range. These papers were from the DCWV Blossoms and Butterflies stack.

Step 4: Using Mod Podge I glued each sheet onto the shelf. To get the paper around the dowel I punched holes, again using the template, and then cut from the edge into the hole. I just glued it up at the cut when sticking it to the shelf.

Step 5: After letting it dry over night, the next thing I did was sand off the overlapping paper from the edges. You could also just cut off the overhang but I like to sand it because it gives it a nice smooth surface. I then had to do a touch up paint around the edges so in hind site I would paint the edges after sanding the paper next time.

And that was it!!

This is the end result


I LOVE them, so does Abbey!! Now I have two more of the same shelves to do for Abbey and one which is a little less "frilly" for Riley. I can't wait to get them all done and up on the wall in the kids bedrooms!

Wednesday, March 7, 2012

Better Scrapbooking March Scrap Pack

When this months scrap pack arrived I was a little worried. It was a very heritagey pack and I have never really done any heritage scrapping before. 

The paper was gorgeous! It was a range called Generations by Simple Stories.


I went to a BBQ at my Nana & Grandad's house and my Nana has photographs EVERYWHERE! Every surface you look at is covered in photos so I borrowed a few from her and scanned them to do my first two layouts.


This is my Dad's family. All 9 of them! My Dad is the last one in the back row.


This is my Nana (Dad's Mum). She said she would have been about 15 or 16 in this photo. She is 84 now. My Nana is awesome!


And just so I don't feel left out ... this is ME! I must have been about 3 in this photo. It was on my Great Uncles farm which we used to visit a lot as kids.


I am lucky enough to have 3 out of my 4 Grandparents still around. On my Mums side we have 4 Generations of girls. It is such a special thing to have in a family. Abbey is very lucky to have 3 generations of advice, wisdom, strength and love to depend upon. My Grandma is 86 years old and I try not to take for granted that she won't always be around. I am so happy that my children can have a relationship with their great-grandparents! 

So even though I was a bit worried to begin with I am really pleased with the end results of this Scrap Pack!  Head on over to the March Better Scrapbooking newsletter to find out how I made these and check out what the other design team member Jennie did too! Also Megan has added some great tips and techniques in too!

Saturday, January 7, 2012

Inspired by Pinterest

I am really addicted to Pinterest.  I can spend hours browsing through the amazing ideas and beautiful things. Today on Pinterest I have 53 Boards and 2979 pins. It sounds pretty crazy! But I love it!!

Follow Me on Pinterest

And although I haven't done half as much as I want I have actually made things that I have been inspired by through Pinterest! So here is an update on what I have made .....

Inspired by THIS, I made this for the playroom ...


I have plans to paint it all pretty but I am undecided on the colours so might wait until I renovate the playroom and make it all matching!

Inspired by THIS I made this ...


I haven't decided if I want to paint the brown board white yet, I think I will leave it until I renovate the Craft Room, make it matching! (hmmm seems to be a renovating theme going on here!)

Inspired by THIS, I made this for my Mum for Christmas (sorry about the bad picture)


The original was made on wood, my one was done on a canvas

Inspired by THIS, I made these ...


For Christmas Day I decided to try out a few new recipes. I am always happy to find new yummy foods!!


there is:
Squid Dogs, Blooming Onion Bread, 7 Layer Dip, Autumn Chopped Salad, Cranberry Bliss Bars, Rosemary Roasted Potatoes, Lamb Kebabs & Crack Bread

Since I am slowly renovating/redecorating my house I am hoping that I will be able to make use of my pins a lot more!

Are you a Pinterest Junkie? Join our group on Facebook HERE and share your Pinterest inspired things!

Tuesday, July 5, 2011

Better Scrapbooking July Scrap Pack

Well the July newsletter is out at Better Scrapbooking and that means I can show off what I made with this months Scrap Pack.


I stole this pic of what was in the scrap pack from fellow design team member Karen, you can check out what she did with it HERE The papers were all from the Fancy Pants Hot Chocolate range.

CRAFT TO DO BOOK


I have sooo many crafting ideas that I want to do so I decided to make a book to keep all my ideas in. I have put 6 TABS saying:

*NEED TO - for all my unfinished projects
*WANT TO - all the projects I REALLY want to do
*DESIGN TEAM - all my projects for the Better Scrapbooking design team
*SKETCHES - scrapbooking sketches I want to do
*CONTESTS - any online competitions or challenges
*MARKET - stuff I am going to make for the craft market

with the all the projects I have put in the book I have also included all the materials I need to make it all. I am hoping that I will be able to be a little more organised with my crafts by using this book!!

MAGNETIC COASTER


I wanted to do something a little different with my coaster rather than just make a coaster so I decided to turn it into an inspirational magnet! You never have too many magnets aye!!

CARDS


Now cards have never been my strong point, I really don't like making them. But I think been on the DT is making me stretch out of my comfort zone and make more cards than I have before! These ones I quite like!

LO


This paper range was PERFECT for the photos I took on our recent Holiday to Taupo and Rotorua. The kids were all rugged up and in their warm jackets which we rarely wear up here in the 'Winterless North'. I love this photo of Riley in his jacket!

If you want to know how I made these head on over to Better Scrapbooking and check out the July Newsletter, also check out what the other Design Team members have done with their packs.

Also head on over to the Better Scrapbooking Blog to see the new July Challenges! Upload your entries in the Better Scrapbooking Gallery and be in to win a monthly prize!

Happy Scrapping everyone!

Thursday, March 17, 2011

Canvas Art & Everyday Life

A few weeks ago my Art Night buddy Janine found a photo of what she called an 'Inchie Canvas' in a magazine. She decided that we needed to make one! So while she had half prepared hers earlier, I cut out lots of squares and rectangles from cardboard while watching her complete embellishing and putting together her canvas. 2 weeks later all I had done was cover my bits of cardboard with co-ordinating patterned papers and painted my canvas black! So yesterday I pulled it out and dusted it off and decided to finish it.


I am VERY pleased with how this turned out! Most of what is on it are scraps and and leftovers so I'm also pleased about using up some more of my stash! Gotta love using your stash up.

Now all I need is a nice wall to put it up on!

I also submitted a photo for the March Photo Challenge over at Better Scrapbooking.

Photo Challenge: Everyday life. Take a photo of something that represents your everyday life.


This week my everyday life has become a two lunchbox morning!! I actually really enjoy making my kids lunches!!

Don't forget to go over and check out the other challenges at Better Scrapbooking! You have until the end of March to get them in and every category wins a prize!!

Layout Challenge: Use your old one off bits left over from your stash, i.e. the last flower from a set, odd brads/eyelets, rub-ons/odd piece of chipboard, etc.

Project Challenge: Create a mini album using old Cd's

Card Challenge: Create a card with cupcakes on it

Would LOVE to see you all joining in!

Tuesday, January 25, 2011

The Ultimate Desk Caddy

My kids LOVE doing artwork, might have some influence from their Mum not really sure teehee! But I have being going insane with the mess of the pencil case getting tipped upside down and having pens, crayons and pencils EVERYWHERE!
Just like this ....


Well I decided enough was enough and I decided to make The Ultimate Desk Caddy for all the kids art supplies.
I found these ....


I sawed them into different heights and also added a couple of toilet rolls. I had a piece of MDF wood laying around (doesn't everyone?) and I painted the edges of that cream. Then using the cutest My Minds Eye paper range around covered all the tubes with 'Alphabet Soup' I used double sided tape to attach the paper and painted the top edge of each tube the same as the wood. I used Mod Podge to cover the wood with some more paper and then sanded the edges. Then using Mod Podge I glued all the tubes to the Wood.

Since it was for Riley & Abbey I decided I'd embellish with a couple of Butterflies and Robots, cause they totally go together!! And then after spending an hour sharpening pencils it was done!!


Easy peasy to make! And super tidy!! Bonus!
Fingers crossed the kids remember they don't have to tip everything upside down and out!!!

Have fun keeping your kids tidy!!

Monday, January 24, 2011

To a More Organised 2011

I don't know about you guys but I NEVER have enough space on my calendar to write up what's going on. Some days are nothing but as the saying goes 'it never rains but it pours' everything seems to fall on the same day and the teeny little squares don't cut it. I can't do diaries either because I always, ALWAYS forget to look in them. I need it up on the wall in my face. I saw this fabulous idea for a homemade whiteboard and I thought PERFECT and set to work making my very own Home made whiteboard monthly planner.


It was super easy to make and I LOVE it!!

First thing I did was find a BIG photo Frame and I mean BIG mine is 70CM x 55CM. My Grandma was about to throw it out and I nabbed it for myself. I Love my family they ALWAYS ask me if I want stuff before they throw it out, they know me all too well!!! I pulled it apart and put the glass somewhere safe and away from my kids!! The wooden frame was black so I sanded it back (with a little help!)


Once most of the black was sanded off I painted the frame an orangey cream colour.
I measured the glass and with some mathematical help from my good friend Nic, I made even squares on the glass with a black vivid. 7 Squares across and 5 down same as a calendar.

On the wooden back of the frame I Mod Podged some 12x12 papers. I used 4 papers in total, two around the edge and 2 in the middle. I used some gorgeous papers from the Fancy Pants 'On a Whimsy' range.

I used some white chipboard alphas to make the days of the week and inked them with Tim Holtz Distress Ink. I used the colour 'Spiced Marmalade'


I used my Stampin' Up Butterfly punch and co-ordinating stamps 'Butterfly Prints' plus some ADORABLE little Flowers from Sassafras Lass to embellish a little on top of my papers.


I then put the frame back together, making sure to put the side I drew the vivid lines on the inside so they are under the glass not on top. I sealed it all up.
I then embellished the outside with the same flowers and butterflies.


I made a big orange flower with felt, ribbons and a button and using a ribbon long enough to reach all around the board I attached a whiteboard marker which I also embellished with the same papers as inside the frame.


And then it was done! You can write on the glass and rub it off just like a white board. I write the calendar numbers in the squares each month and then will wipe them all off and start new each month.


I am already using it and Riley already knows what we have planned for each day!
So here's to a more organised 2011!!